viernes, 23 de abril de 2010
Tut: "Vampires Diaries"

domingo, 7 de febrero de 2010
Tut "Lavender Dreams"

It's done.
I hope you like this tut.
lunes, 5 de octubre de 2009
Tut "Castle of Ice"

I love to see all your results, if you want you can send me your tags with the results of my tuts to: newartisticdreams@gmail.com
Thank you for try this and the others tuts.
This tutorial was writting by me, Mariel - ©Artistic Dreams on 5th of october of 2009 any resemblance to any other tutorial is completely coincidental
Mariel - ©Artistic Dreams
lunes, 28 de septiembre de 2009
Tut "Blue Stars"
I love to see all your results, if you want you can send me your tags with the results of my tuts to: newartisticdreams@gmail.com
Thank you for try this and the others tuts.
This tutorial was writting by me, Mariel - ©Artistic Dreams on 28th of september of 2009 any resemblance to any other tutorial is completely coincidental
Mariel - ©Artistic Dreams
domingo, 27 de septiembre de 2009
Tut "Thoughts of Autumn"
I love to see all your results, if you want you can send me your tags with the results of my tuts to: newartisticdreams@gmail.com
Thank you for try this and the others tuts.
This tutorial was writting by me, Mariel - ©Artistic Dreams on 26th of september of 2009 any resemblance to any other tutorial is completely coincidental.
Mariel - ©Artistic Dreams
sábado, 26 de septiembre de 2009
Tut "Absolutly Green"

For this tutorial you will need the following things:
First of all the beautiful scrap kit from Funky Fever called "Green Goddess", is a PTU and you can purchase this kit HERE.
The mask # 02 from Zuzanna you can download HERE.
Let's begin:
1.- Open a new raster layer of 500 x 500 pixels.
2.- Copy and paste as new layer Paper 9, then open your mask in your PSP and go to masks/new mask/from an image, and apply the mask to your paper layer. Now go to masks/delete mask.
3.- Copy and paste as new layer Starframe.
4.- Copy and paste as new layer Fancyframe2, resize to 80%. Now select into your frame with your magic wand, go to selection/modify/expand/4, then copy and paste as new layer Paper 6, go to selection/invert and then edit/cut. Move the paper layer below the frame layer.
5.- Now copy and paste as new layer the feather into the frame. Resize to convenience and reflet.
6.- Copy and paste as new layer bow 3, resize to 50%.
7.- Copy and paste the poser tube, resize to convenience, and duplicate this layer.
8.- Now copy and paste all the other elements you can see in my tag, the butterflyclimber, resize to 50%, duplicate and relfet the copy layer. Copy and paste as new layer the Fantasyboat, resize to convenience, and do the same with the floralbow.
9.- Now move the copy of the poser tube forward all the other layer and with your lace tool select all what exceed the frame and delete. Do the same with the poser below the frame.
10.- Merge all visible layers and add your copyright. Now write your name with a font of your choice and a colour who match with your tube, and then apply some drop shadow of choice.
11.- Save as png.
I hope you like this tut.
I love to see all your results, if you want you can send me your tags with the results of my tuts to: newartisticdreams@gmail.com
Thank you for try this and the others tuts.
This tutorial was writting by me, Mariel - ©Artistic Dreams on 26th of september of 2009 any resemblance to any other tutorial is completely coincidental.
Mariel - ©Artistic Dreams
jueves, 24 de septiembre de 2009
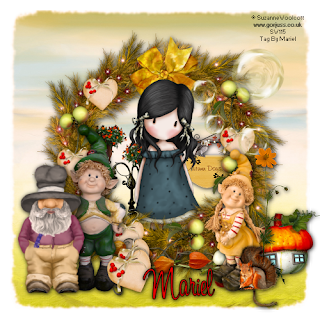
Tut "Autumn Days"

For this new tutorial you will need the following things:
First of all the beautiful scrap kit from Scrappingmar, called "Autumn Days", is a PTU and you can purchase the kit HERE.
The tube is one the of the wonderful ©Gorjuss girls, from Suzanne Woolcott, you can purchase her tubes HERE.
Let's begin:
1.- Open a new raster layer of 500 x 500 pixels.
2.- Copy and paste as new layer Paper 8, resize to 13%. The scrap kit is full size, so you have to resize more.
3.- Copy and paste as new layer Element 55, resize to 20%, apply some drop shadow of your choice.
4.- Now copy and paste as new layer Elements 20 and 51, resize to convenience, and move both behind the crow and with your eraser tool delete all what exceed the crown. Apply the same drop shadow as before.
5.- Now copy and paste as new layer the ©Gorjuss tube, resize to 75%, move this layer behind the crow, then duplicate the tube layer once, and move this layer up, now with your lace tool select all what exceed the crow and delete, so you can see the girl through the crown.
6.- Now copy and paste as new layers the elfs, the squirrel, the mushroom house, and the felp heart, resize all to convenience and apply drop shadow as before.
7.- Copy and paste as new layer the bubble, resize to convenience, and duplicate the layer three times. Now resize all to different sizes and put them as you can see in my tag.
8.- Copy and paste as new layers other elements as flowers or leaves, resize them and apply drop shadow.
9.- Merge all visible layers, and add your licence number, and your name with a font of your choice. Use a strong red inside your letters and use the same drop shadow as before.
10.- Save as png.
It's done.
I hope you like this tut.
I love to see all your results, if you want you can send me your tags with the results of my tuts to: newartisticdreams@gmail.com
Thank you for try this and the others tuts.
This tutorial was writting by me, Mariel - ©Artistic Dreams on 24th of september of 2009 any resemblance to any other tutorial is completely coincidental.
Mariel - ©Artistic Dreams
miércoles, 23 de septiembre de 2009
Tut "I Love Fall Colours"

I love to see all your results, if you want you can send me your tags with the results of my tuts to: newartisticdreams@gmail.com
Thank you for try this and the others tuts.
This tutorial was writting by me, Mariel - ©Artistic Dreams on 23rd of september of 2009 any resemblance to any other tutorial is completely coincidental.
Mariel - ©Artistic Dreams
lunes, 21 de septiembre de 2009
Tut "Precious Autumn"

I love to see all your results, if you want you can send me your tags with the results of my tuts to: newartisticdreams@gmail.com
Thank you for try this and the others tuts.
This tutorial was writting by me, Mariel - ©Artistic Dreams on 21st of september of 2009 any resemblance to any other tutorial is completely coincidental.
Mariel - ©Artistic Dreams
domingo, 20 de septiembre de 2009
Tut "Love Me"

For this tutorial you will need the following things:
First of all I used the beautiful scrap kit from DMG Scraps called "Beaute D'Azur", is a PTU and you can purchase the kit HERE.
The tag is from ©Zindy Nielsen, you can purchase her art HERE.
The mask # 1, is from Babe's Designz and you can purchase this HERE.
Let's begin:
1.- Open a new raster layer of 500 x 500 pixels.
2.- Copy and paste as new layer Paper 4, then open your mask #1 in your PSP, go to masks/new mask/ from an image, and apply the mask to the paper layer. Go to masks/invert and then delete mask.
3.- Copy and paste as new layer frame 3, with your magic wand select into the frame, go to selection/modify/expand 10, then copy and paste as new layer Paper 2, then go to selection/invert and then edit/cut. Move this layer below the frame layer.
4.- Copy and paste as new layer Doodle 2, resize to 50%, relfet, and put this layer below the backgrown frame layer, then duplicate the layer, and turn up.
5.- Copy and paste as new layer Ivy 2, resize to 50%, put at one side of the frame, and duplicate once, then reflet this layer. See my image for help.
6.- Copy and paste as new layer the ©Zindy tube, resize to 75%, put this layer as frame backgrownd and delete all what exceed the frame. Apply drop shadow of choice.
7.- Copy and paste as new layer drapery 2, resize to 75%, and put this layer forward the mask layer. Apply drop shadow as before.
8.- Copy and paste as new layer ribbon 5, resize to 50%, and put as you can see in my tag. Apply drop shadow.
9.- Copy and paste as new layer flower 4, resize to 50%, apply drop shadow of your choice, duplicate the layer and put them at both sides of your frame. See my image por help.
10.- Merge all visible layers, add your copyright and your name, I used font: A&S Snapper Script, size 48, colour outside: #516E7F and colour inside: #D0DFE7. Apply drop shadow as before.
11.- Save as png.
It´s done.
I hope you like this tut.
I love to see all your results, if you want you can send me your tags with the results of my tuts to: newartisticdreams@gmail.com
Thank you for try this and the others tuts.
This tutorial was writting by me, Mariel - ©Artistic Dreams on 20th of september of 2009 any resemblance to any other tutorial is completely coincidental.
Mariel - ©Artistic Dreams
jueves, 17 de septiembre de 2009
Tut "Dusky Bliss"

I love to see all your results, if you want you can send me your tags with the results of my tuts to: newartisticdreams@gmail.com
Thank you for try this and the others tuts.
This tutorial was writting by me, Mariel - ©Artistic Dreams on 17th of september of 2009 any resemblance to any other tutorial is completely coincidental.
Mariel - ©Artistic Dreams
Tut "I'm not a Princess"

I love to see all your results, if you want you can send me your tags with the results of my tuts to: newartisticdreams@gmail.com
Thank you for try this and the others tuts.
This tutorial was writting by me, Mariel - ©Artistic Dreams on 17th of september of 2009 any resemblance to any other tutorial is completely coincidental.
Mariel - ©Artistic Dreams
domingo, 6 de septiembre de 2009
Tut "Happy Day"

For this tut you will need the following things:
First of all the beautiful scrap kit from Caravan Scraps, called "Afternoon Delight", is a PTU and you can purchase this kit HERE.
The tube is from ©Suzanne Woolcott and you can purchase her tubes HERE.
Let's begin:
1.- Open a new raster layer of 500 x 500 pixels.
2.- Copy and paste as new layer Paper 4, with your rectangle selection tool, select a rectangle as you can see in my tag, and then go to selection/invert and then Edit/Cut. Apply some drop shadow of your choice.
3.- Copy and paste as new layer Element Tree, resize to 60%, then apply drop shadow of choice, and duplicate the layer, then reflet the copy.
4.- Copy and paste as new layer Element Tree 2, resize to 75%, then apply drop shadow as you used before.
5.- Copy and paste as new layer Element Fence, resize to 25%, apply drop shadow. Then duplicate and reflet the copy layer.
6.- Copy and paste as new layer Element Kitty, resize to 25%, apply drop shadow.
7.- Copy and paste as new layer Element Puppy, resize to 20%, apply drop shadow.
8.- Copy and paste as new layer Element Birdie 3, resize to 20%, apply drop shadow as before.
9.- Copy and paste the ©Gorjuss tube, resize to convenience, and apply drop shadow as before.
10.- Merge all visible layers, add your licence number and your name with a font of your choice, I used: A&S Black Swan.
11.- Save as png.
It's done.
I hope you like this tut.
I love to see all your results, if you want you can send me your tags with the results of my tuts to: newartisticdreams@gmail.com
Thank you for try this and the others tuts.
This tutorial was writting by me, Mariel - ©Artistic Dreams on 6th of september of 2009 any resemblance to any other tutorial is completely coincidental.
Mariel - ©Artistic Dreams
Tut "Country Life"

I love to see all your results, if you want you can send me your tags with the results of my tuts to: newartisticdreams@gmail.com
Thank you for try this and the others tuts.
This tutorial was writting by me, Mariel - ©Artistic Dreams on 6th of september of 2009 any resemblance to any other tutorial is completely coincidental.
Mariel - ©Artistic Dreams
Tut "Sweetie"

I love to see all your results, if you want you can send me your tags with the results of my tuts to: newartisticdreams@gmail.com
Thank you for try this and the others tuts.
This tutorial was writting by me, Mariel - ©Artistic Dreams on 6th of september of 2009 any resemblance to any other tutorial is completely coincidental.
Mariel - ©Artistic Dreams
lunes, 31 de agosto de 2009
Do you Believe in Faeries?

First of all the beautiful scrap kit from Karla Designz, called "Fantasy in the night", is a PTU and you can purchase her scrap kit HERE.
The tube is a ©Suzanne Woolcott girl and you need a licence number and purchase the tubes HERE.
The Babe's Designs Mask # 13 is HERE and the Linda for Creative Misfits Forum Template is HERE.
Let's begin:
I love to see all your results, if you want you can send me your tags with the results of my tuts to: newartisticdreams@gmail.com
Thank you for try this and the others tuts.
This tutorial was writting by me, Mariel - ©Artistic Dreams on 31st of august of 2009 any resemblance to any other tutorial is completely coincidental.
Mariel - ©Artistic Dreams
martes, 25 de agosto de 2009
Tut "Blowing Life"

First of all the beautiful scrap kit from Templates and Scraps, called "Romantic", is a PTU and you can purchase HERE.
The tube is one of ©Zindy Nielsen and you can purchase her tubes HERE.
The mask is one from Zuzanna, and you can download HERE.
Let's begin:
1.- Open a new raster layer of 500 x 500 pixels.
2.- Copy and paste as new layer a paper of your choice from the scrap kit, then open your mask in your PSP, go to masks/new mask/from an image, and apply to the paper layer, then go to masks/delete mask.
3.- Copy and paste as new layer "circ_4c", resize to 50%. Apply drop shadow with the following settings: 1 - 1 - 90 - 9,9 with black colour.
4.- Copy and paste as new layer "Love 5", resize to 40%.
5.- Copy and paste as new layer "Cuerda", resize to 40% and now with your eraser tool delete the part of the lace what exceed of the heart.
6.- Copy and paste as new layer "Lazo L2", resize to 15% and apply the same drop shadow as you used before.
7.- Copy and paste as new layer the ©Zindy Nielsen tube, and resize to 75%. Apply drop shadow as you used before.
8.- Copy and paste as new layer the pink petal, resize to 10% and duplicate a few times, then do the same with the yellow petal, and put this layers as you can see in my tag.
9.- Merge all visible layers, add your licence number and write your name, I used font: The Buns, size: 36, colour outside: #800000, colour inside: #F3EFC4, and apply drop shadow as you used before.
10.- Save as png.
It's done.
I hope you like this tut.
I love to see all your results, if you want you can send me your tags with the results of my tuts to: newartisticdreams@gmail.com
Thank you for try this and the others tuts.
This tutorial was writting by me, Mariel - ©Artistic Dreams on 25th of august of 2009 any resemblance to any other tutorial is completely coincidental.
Mariel - ©Artistic Dreams
jueves, 20 de agosto de 2009
Tut "Beware"

I love to see all your results, if you want you can send me your tags with the results of my tuts to: newartisticdreams@gmail.com
Thank you for try this and the others tuts.
This tutorial was writting by me, Mariel - ©Artistic Dreams on 20th of august of 2009 any resemblance to any other tutorial is completely coincidental.
Mariel - ©Artistic Dreams
jueves, 13 de agosto de 2009
Tut "Sweet Birds"

For this tut you will need the following things:
First of all the beautiful scrap kit from Paci Tubes, called "Whittle Bird Twitts", is a PTU and you can purchase this kit HERE.
The tube is a ©Gorjuss from Suzanne Woolcott, and you can purchase her tubes and art HERE.
Let's begin:
1.- Open a new raster layer of 500 x 500 pixels.
2.- Copy and paste as new layer Paper 19, as a background layer, resize to 60%.
3.- Copy and paste Papers 16 and 20, resize both to 40% and rotate one 20 degrees to the left and the other 20 degrees to the right. Apply drop shadow of choice.
4.- Copy and paste as new layer Paperclip, resize to 25% and rotate free 20 degrees to th right. Put this layer as you can see in my tag.
5.- Copy and paste as new layers three birds of your choice, resize them to three differents sizes, ans apply drop shadow of your choice, see my tag for help.
6.- Copy and paste as new layers three differents paper flowers, resize them to three different sizes and put them as you can see in my tag.
7.- Copy and paste as new layer the ©Gorjuss girl, resize to 85%, and apply drop shadow as you used before.
8.- Write your name I used font: Susie's Hand, size: 48, colour outside: black, colour inside: #B2F709. Apply drop shadow of choice.
9.- Add your licence number and save as png.
It's done.
I hope you like this tut.
I love to see all your results, if you want you can send me your tags with the results of my tuts to: newartisticdreams@gmail.com
Thank you for try this and the others tuts.
This tutorial was writting by me, Mariel - ©Artistic Dreams on 14th of august of 2009 any resemblance to any other tutorial is completely coincidental.
Mariel - ©Artistic Dreams
martes, 11 de agosto de 2009
Tut "Autumn is coming"

First of all the beautiful scrap kit from Gemini Creationz, called "An Autumn Romance", is a PTU and you can purchase this kit HERE.
The tube is one of the beautiful collection from ©Suzanne Woolcott and you can purchase her tubes and art HERE.
I love to see all your results, if you want you can send me your tags with the results of my tuts to: newartisticdreams@gmail.com
Thank you for try this and the others tuts.
This tutorial was writting by me, Mariel - ©Artistic Dreams on 11th of august of 2009 any resemblance to any other tutorial is completely coincidental.
Mariel - ©Artistic Dreams