If you want to try in Dutch clic on the flag:
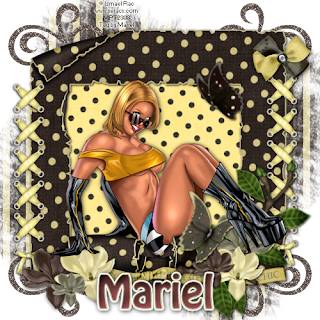
Well my second freebie today, hope you like it. I love all the Ivette and Missy scrap kits, and this one is one of them.
For the following tut you will need the beautiful scrap kit freebie from Misfits Scrapz called "Shabby Chic" and you can download HERE.
The tube is a girl from ©Ismael Rac, and you can purchase his art in MPT, HERE
The mask # 167, is from Weescotslass Creations, and you can download this mask HERE.
Let's begin:
1.- Open a new raster layer of 500 x 500 pixels.
2.- Copy and paste as new layer Paper 05, open your mask in PSP, and then go to masks/new mask/ from an image. Aply the mask # 167 to the paper layer, then go to masks/delete mask. And resize the layer by 120%.
3.- Copy and paste as new layer Frame 1, resize to 90%. With your magic wand select into the frame, Go to selections/modify/ expand 3. Copy and paste Paper 7 as new layer, then go to selections/invert, and then Edit/Cut. Put this layer below the frame layer.
4.- Copy and paste as new layer Doodle 3, resize to 50%, duplicate this layer and reflet. Then again duplicate this layer and turn down, and again duplicate the layer and reflet. Put all this layers below the frame layer, as you can see in my image.
5.- Copy and paste as new layer Crossribbon 1, resize to 50%, layers/duplicate layer and reflet, In this second layer delete the first cross ribbon at the top, as you can see in my image. Add drop shadow of choice.
6.- Copy and paste as new layer bow 4, resize to 50% and add the same drop shadow as before.
7.- Copy and paste as new layer FlowerBranch, resize to 75%, add drop shadow of choice.
8.- Copy and paste as new layer both butterflies, resize to convenience and add drop shadow, do the same with Flowers 1, 2 and 3. Resize in different sizes, and put as you can see in my image.
9.- Select the paper dotty, now copy and paste as new layer the girl tube, rezise to 75%, go to layers/duplicate layer, and put one of them as top layer, then with your eraser tool, delete all what you need as you can see in my image. Add drop shadow to the first layer below.
10.- Write your licence number, and merge all visible layers.
11.- Write your name, I used font: Hobo Std, size 48, colours: outside: #b9ae6e, inside: #703b3e. Special effects/Eye Candy 4000/ Gradient Glow colour white, with default settings. Add drop shadow as before.
12.- Save as png.
I hope you like it. I love to see all you result, if you want you can send me your tags with the results of my tuts to: newartisticdreams@gmail.com
Thank you for try this and the others tuts.This tutorial was writting by me, Mariel - Artistic Dreams© on 29th of march of 2009, any resemblance to any other tutorial is completely coincidental.
Mariel - ©Artistic Dreams


No hay comentarios:
Publicar un comentario