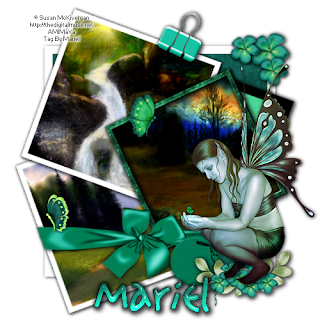
Well, today I made this tut with the beautiful digital art of Dee and her scrap called "Mintie". I love this colours and hope you like it too. Since my child time, I love green colours and when I saw Dee's scraps I fall in love with this kit. I'm a lucky girl, she told me if I want to be in her Creative Team, and so I said yes at a moment, he he he!!!. Thank you Dee, I'm glad you like my job, sweetie, I love yours.
For this tut you will need the followings things:
The beautiful scrap kit called "Mintie" and three beautiful pictures of Digital Art from Dee's store. You can purchase her job HERE. I choose "A Spring Day", "Cascade" and "Dawn", but there in her store, you have more options if you like others.
The beautiful fairy tube is from ©Susan McKivergan, and you can purchase her art in AMI's HERE.
The template is the template # 1 from my friend Aisha, you can download her templates and others freebies in her blog HERE. Please remember leave some love to her for doing this beautiful work.
Let's begin:
1.- Open a new raster layer of 500 x 500 pixels, transparent.
2.- Open Aisha's template # 1 in your PSP. Now select the square#1, copy and paste as new layer, resize to 60%. Select into this layer with your magic wand, copy and paste as new layer "DD_Mintie_paper 10", resize to 50%. Go to Select/invert, and then edit/cut. Delete the template grey layer before this.
3.- Select the frame # 1, from template, copy and paste as new layer, resize to 60%. Put this layer forward the paper layer, and merge all visible layers. Then add some drop shadow of choice.
4.- Open a new raster layer, as in the step # 1, now copy and paste as new layer square # 2 from template, resize to 60%, select with your magic wand again into this grey square layer, copy the Digital Art from Dee called "A spring day", and paste as new layer, resize to 60%, go to select/invert and the Edit/cut. Now add the white frame from template, resize to 60% too, and merge all visible layers. Now add the same drop shadow as before.
5.- Cut this image and go to the first tag you made. Paste this as new layer. Rotate 25 degrees to the left.
6.- Repeat the same you did in step # 4 but now change your image, I used Digital Art from Dee called "Cascade" for do this. And now when the photograph is end, rotate 25 degrees to the right.
7.- Now in your tag, copy and paste as new layer one of the frames from the Dee's kit "Mintie", I used frame # 01. Resize to convenience, and rotate to the left 25 degrees. Select into the frame with your magic wand, go to select/modify/ expand 5. Now copy and paste as new layer the Digital Art called "Dawn", Resize to convenience, go to select/invert and then edit/cut. Rotate this layer to the left 25 degrees, and then put this layer below the frame layer.
8.- Now work with the black frame from your template, and repeat the step # 2, but now resize to 40%, and rotate the layer 25 degrees to the right. Add drop shadow.
9.- Copy and paste as new layer, a "Ribbon and bow" from the scrap kit, I used the dark green bow. You can choose the same or other colour. Resize to convenience, and delete all what you need as you can see in my image.
10.- Add all the others elements, the butterflies, the flowers, the tag and the binder clip, resize to convenience, see my image for help. If you want to put the binder clip in the same position as the frame, you have to rotate this layer 25 degrees to the right. Add drop shadow to all the elements.
11.- Copy and paste as new layer the ©Susan McKivergan tube, resize to convenience. Add the same drop shadow as before.
12.- Put your licence number, and merge all visible layers.
13.- Now write your name, I used font: Amazon, size: 48, colours: Outside: #000000, Inside: #18c3a4. Effects/3d/ inner bevel of choice, and then I add some glass effect from Eye Candy 4000. Add drop shadow of choice, and save your tag as png.
It's done.
This tutorial was writting by me, Mariel - Artistic Dreams© on 12th of march of 2009, any resemblance to any other tutorial is completely coincidental.
Mariel - ©Artistic Dreams


No hay comentarios:
Publicar un comentario