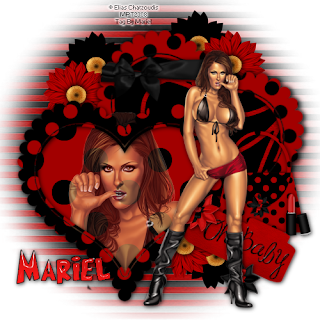
One more tut, hope you like it. Is with a beautiful scrap kit from Dee. And my generous friend Dee have an special gift for my readers in her blog, an special discount coupon in her product "Sexy Dew", the scrap kit you need for this tut!!!
read what Dee says:
"Mariel has a HOT! new tutorial out called 'Oh Baby' using my Sexy Dew kit. Thank you so much Mariel, it's gorgeous!Visit Mariels blog here for the tutorial and if you wish to try the tut, I'm giving Mariels blog readers (and my readers of course) a 30% discount off the Sexy Dew kit. Use coupon code DSMARIEL30 at checkout of DeeStore. Offer ends 3rd of April of 2009."
For this tut you will need the following things:
First of all this beautiful scrap kit from Dee called "Sexy dew", is a PTU and you can purchase this kit HERE.
The girl tube is from ©Elias Chatzoudis, you can purchase his tubes in MPT, HERE.
The mask you can download HERE.
Let's begin:
1.- Open a new raster layer of 500 x 500 pixels.
2.- Open the mask in your PSP, copy and paste the black paper 09, go to masks/ new mask from an image, apply the mask and then again go to masks/delete mask.
3.- Do the same as before with red paper 10. Move this layer a bit as you can see in my image. So you can see both masks layers.
4.- Now copy and paste as new layer Frame 03, resize to 60%. with your magic wand select into the frame copy a paper of choice (I used Paper 02) and paste as new layer. Go to select/ modify/expand 5, and then again selection/invert select. Edit/ cut. Put this layer below the frame.
5.- Do the same as before with Frame 04, and paper 08.
6.- Now add the elements you like in your tag, I used, some flowers, one of the bags, the lipstick, and the tag, resize to convenience, look my image for help.
7.- Now select into the frame with your magic wand, now copy and paste as new layer the girl tube face, go to download the opacity of this layer to 60%. Delete with your eraser tool all what exceed the frame.
8.- Now add the girl tube, and resize to convenience. See my image for help.
9.- Add your licence number, and merge all visible layers.
10.- Write your name, font of choice. I used a glass effects. And add drop shadow of choice.
11.- Save as png.
It's done.
I hope you like it. I love to see all you result, if you want you can send me your tags with the results of my tuts to: newartisticdreams@gmail.com
Thank you for try this and the others tuts.This tutorial was writting by me, Mariel - Artistic Dreams© on 30th of march of 2009, any resemblance to any other tutorial is completely coincidental.
Mariel - ©Artistic Dreams


No hay comentarios:
Publicar un comentario