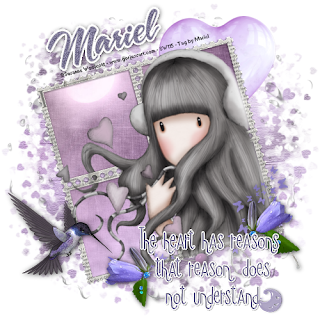
For this tutorial you will need the following things:
First of all the beautiful scrap kit of Scarppingmar called "Lavender Dreams", is a PTU and you can purchase this HERE.
The tube is one of the beautiful girls of Suzanne Woolcott, you need a licence number and you have to buy her tubes HERE.
The mask is HERE.
Let's begin:
1.- Open a new raster layer of 500 x 500 pixels.
2.- Copy and paste as new layer Paper # 5. Resize to 80%. Open your mask in your PSP and then go to masks/new mask/ from an image and apply the mask to the paper layer. Then go to masks/invert and then masks/delete mask.
3.- Copy and paste as new layer the frame (59) from the scrap, resize to 35%, and then go to image/rotate free/15 degrees to the left.
4.- Select into this frame, with your magic wand, the four windows at the same time. Now copy and paste as new layer Paper # 15. Resize to 50%. Rotate free this layer 15 degrees to the left, and move this layer below the frame layer.
5.- Copy and paste as new layer Element 39, resize to 30% and move the layer below the background of the frame, move the baloon to the right as you can see in my tag.
6.- Copy and paste as new layer the gorjuss tube and resize if you need, I use 80%. Then rotate free 15 degrees to the left. And apply a black drop shadow with this settings, 1 - 1 - 90 - 9,9. I delete in the hair of the girl a little just see my tag for details.
7.- Copy and paste as new layer Element 32, resize to 40% and reflet. Put this element as you can see in my tag. Add the same drop shadow as before.
8.- Now copy and paste as new layer the Element 63, resize to 25%, and apply the same drop shadow as you used before. Put the bird as you can see in my tag.
9.- Copy and paste as new layer the Wordart element 67. resize to convenience and put in your tag as you can see in my tag.
10.- Now merge all visible layers, add your licence number and your name, I used font A&S Snapper Script, size 48, with this colour inside:#7D7896, outside null. Then apply DBS flux bright noise of your choise, and Eye Candy 4000, effect gradient glow with white colour. With the selection in the word of your name, rotate image free 15 degrees, and use the same drop shadow as before.
11.- Save your tag as png.
It's done.
I hope you like this tut.
I love to see all your results, if you want you can send me your tags with the results of my tuts to: newartisticdreams@gmail.com
Thank you for try this and the others tuts.
This tutorial was writting by me, Mariel - ©Artistic Dreams on 4th of october of 2009 any resemblance to any other tutorial is completely coincidental.
Mariel - ©Artistic Dream


No hay comentarios:
Publicar un comentario