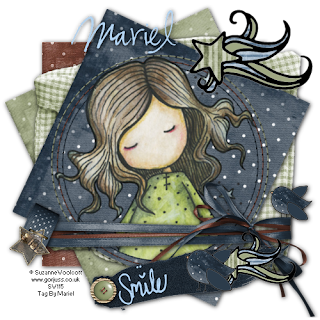
For this tut you will need the following things:
The beautiful scrap kit from Designs by Helly, called "Could be Happy", is a PTU and you can purchase the kit at Paradise4scrappers, HERE.
The tube is a ©Suzanne Woolcott girl, so you need licence number and can purchase the tubes in her shop HERE.
Let's begin:
1.- Open a new raster layer of 500 x 500 pixels.
2.- Copy and paste as new layer Paper 2, resize to 50%, do the same with Papers 3, and 1, rotate the green paper layer 25 degrees to the left, and the blue paper layer 25 degrees to the right. And apply drop shadow of choice to the three layers.
3.- Copy and paste as new layer Frame 1, resize to 50%, and move this layer below the blue paper layer. Apply the same drop shadow as before.
4.- Copy and paste as new layer Circle stitching, resize to 75%. With your magic wand select into the circle stitching frame, now copy and paste as new layer the ©Suzanne Woolcott tube, , go to selection /invert select, and delete in your ®Gorjuss tube all what exceed the frame with your eraser tool.
5.- Copy and paste as new layer Ribbon wrap 1, resize to 50%. And put this layer as you can see in my tag.
6.- Copy and paste as new layer Birdie with outline, resize to 10% and put this layer as you can see in my image.
7.- Copy and paste as new layer Star doodle with outline, resize to 50%, and apply drop shadow as you used before.
8.- Copy and paste as new layer Paint smear. Put this layer as you can see in my tag.
9.- Copy and paste as new layer Ribbon tab 1, resize to 50% and rotate free 25 degrees to the right. Put them as you can see in my tag. Apply drop shadow as before.
10.- Copy and paste the button 3, resize to 10 % and apply drop shadow as you used before.
11.- Merge all visible layers and add your licence number.
12.- Write your name, I used font: Susie's hand, size: 72, Colour outside: none, colour inside: #B2D3F1 and add drop shadow of choice.
13.- Save as png.
It's done.
I hope you like it.
I love to see all your results, if you want you can send me your tags with the results of my tuts to: newartisticdreams@gmail.com
Thank you for try this and the others tuts.This tutorial was writting by me, Mariel - ©Artistic Dreams on 29th of may of 2009, any resemblance to any other tutorial is completely coincidental.
Mariel - ©Artistic Dreams


No hay comentarios:
Publicar un comentario