For this tut you will need:
The wonderful scrap kit from PimpD Designz, called "Sticky Sweet", is a PTU and you can purchase this kit HERE and HERE.
The tube is from ©Suzanne Woolcott and you can purchase her art HERE.
The mask is the number 178 from Weescotslass Creations and you can download HERE.
Let's begin:
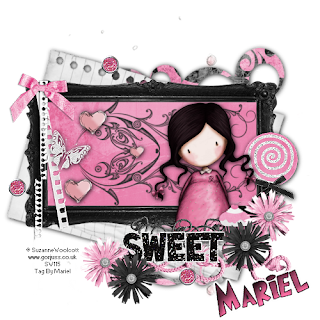
1.- Open a new raster layer of 500 x 500 pixels.
2.- Copy and paste a paper of choice, I used one of ©Suzanne Woolcott element pack called Bunnies & Bears, but you can use one of your choice.
3.- Open the mask in you PSP, go to masks/new mask/from an image. Apply the mask to the paper layer, and then go to masks/delete mask.
4.- Copy and paste as new layer Back Print, resize to 75% and add drop shadow with the following settings: 1-1-99-9,9. Black colour.
5.- Copy and paste as new layer Frame 06, rotate free 15 degrees to the right. Add drop shadow as before.
6.- Copy and paste as new layer Frame 04, resize to 75%, with your magic wand select into the frame, go to selection/modify/expand 5. Copy and paste as new layer Paper 06, resize to 75%, go to selection/invert and then edit/cut. Put this layer below the frame layer.
7.- Copy and paste as new layer Doodle 02, resize to 50%, duplicate layer, and turn down one of them. Put both layers as you can see in my image.
8.- Copy and paste as new layer one of the hearts of element pack of ©Gorjuss tubes. Duplicate twice and resize one of them to 50%. Add drop shadow.
9.- Copy and paste as new layer Paper bow. With your eraser tool delete part of the paper if exceed the frame. You can use my image for help.
10.- Copy and paste as new layer the ©Gorjuss tube, resize to convenience, add drop shadow.
11.- Now copy and paste as new layers all the other elements from de scrap kit, the word art, the flowers, the cupe cake, the lollipop, and the bows pink and black. Resize to convenience and add drop shadow.
12.- Copy and paste as new layer Glitter Butterfly, rotate 15 degree to the righ and add drop shadow, put this layer as you can see in my image.
13.- Copy and paste as new layer Glitter button, duplicate twice, resize to 25% and put this layers as you can see in my tag.
14.- Merge all visible layers, and add your licence number.
15.- Write your name, I used font: Lucy size: 36, Colour outside: black, colour inside: #B65176. Add some effects, I used A little inner bevel, and Eye Candy 4000/gradient glow, white colour with default settings.
16.- Save as png.
It's done.
I hope you like it. I love to see all you result, if you want you can send me your tags with the results of my tuts to: newartisticdreams@gmail.com.
Thank you for try this and the others tuts.This tutorial was writting by me, Mariel - Artistic Dreams© on 9th of april of 2009, any resemblance to any other tutorial is completely coincidental.
Mariel - ©Artistic Dreams


No hay comentarios:
Publicar un comentario