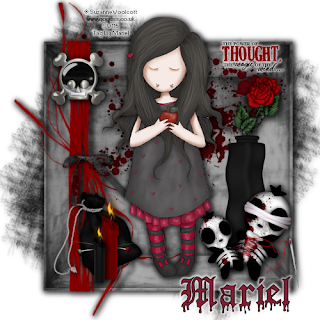
Hi all, today I make a new tut using the beautiful vampire girl tube, from ©GorjussArt, you can purchase your tube HERE. Please, read more information about this exclusive tube HERE.
The scrap kit I used is from ©Amanda Fontaine, is a PTU called "The VooDooThatUDo" and you can find this beautiful scrap kit on AMI's web page, HERE.
The mask is from Weestcotslass Creations, is the number 167, and you can find it HERE.
Let's begin:
1.- Open a new raster layer of 500 x 500 pixels, transparent.
2.- Copy and paste as new layer the paper #3 from Amanda Fontaine's kit. Open your mask in your PSP, go to masks/new mask/ from an image, apply the selected mask, then go to Masks/ delete mask. Add drop shadow of choice.
3.- Open Box # 5, copy and paste as new layer, resize to 90%.
4.- Open Bloodsplatter # 3, copy and paste as new layer, resize to 70%.
5.- Open Bloody bow # 3, copy and paste as new layer on box lace, as you can see in my image, resize to 25%.
6.- Open Hex Bag # 1, copy and paste as new layer, resize to 80%.
7.- Open both candles, black and red, copy and paste both as new layers, resize red candle to 40% and black candle to 30%.
8.- Open pins # 2, copy and paste as new layers, red pin and grey pin. Resize both layers to 40 %. And reflet red pin layer. Put both layers below Candle's layers.
9.- Open skull button # 1, copy and paste as new layer, resize to 40%.
10.- Open Vase # 1, copy and paste as new layer, resize to 40%.
11.- Open Rose # 4, copy and paste as new layer, resize to 30%, and relfet this layer. Put the rose's layer below the vase layer.
12.- Open Doll Stiched Up, copy and paste as new layer, resize to 50%.
13.- Open Doll with Pins and Stains, copy and paste as new layer, resize to 25%, and then reflet layer.
14.- Now open the SWCR_FANGS tube, select, copy and paste as new layer, in the middle of the box, as you can see in my image. Add drop shadow of choice to all the elements, and the tube.
15.- Add your licence number, and merge all visible layers.
16.- Write your name, I used font: Halloween_blood of Dracula. Size: 48, colour Outside: #1a1212, colour inside: #821d34. Add drop shadow of choice if you want not use filters, you can use some white drop shadow. I used Eye Candy 4000/corona. White colour.
17.- Save as png.
It's done.
This tutorial was writting by me, Mariel - Artistic Dreams© on 8th of march of 2009, any resemblance to any other tutorial is completely coincidental.
Mariel - ©Artistic Dreams


No hay comentarios:
Publicar un comentario