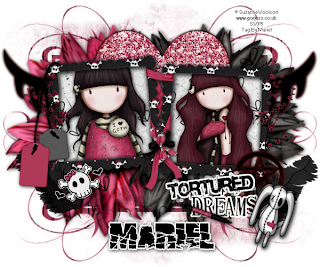
Hi today I make this beautiful gothic tag, and hope you will enjoy the tut.
For this tutorial you will need the following things:
The beautiful scrap kit from Tammy of Scraps With Attitude, is a PTU called"Tortured Dreams" and you can purchase HERE.
Two tubes from ©Suzanne Woolcott, you can purchase her art art her shop HERE.
Mask # 12 you can download HERE.
Let's begin:
1.- Open a new raster layer of 500 x 600 pixels. Transparent.
2.- Copy and paste as new layer Tortured Dreams_Paper 6.
3.- Open the mask provided in your PSP, in your tag with the paper layer select, go to masks/new mask/from an image, and apply the mask #12. Then go to Masks/delete mask.
4.- Copy and paste as new layer Tortured Dreams_Flower 1, resize to 80%.
5.- Do the same as step #4 with Tortured Dreams_Flower 2. Then add drop shadow of choice to both flowers layers.
6.- Copy and paste as new layer Tortured Dreams_Tattoo Heart. Go to Effects/special effects/Eye Candy 4000/Corona with default settings. Colour:#800000.
7.- Copy and paste Tortured Dreams_Frame 3. resize to 60%.
8.- With your magic wand select into both squares frames. Copy and paste as new layer Tortured Dreams_Paper 1. Resize to 60%. Go to select/modify/expand 5/invert selection. Then Edit / Cut. Put this layer below the frame.
9.- Copy and paste the ©Gorjuss tubes, resize to convenience. Add drop shadow of choice.
10.- Copy and paste as new layer Tortured Dreams_Cherry Blossom 1. Resize to 30%. Duplicate layer and reflet this second layer, see my image for help.
11.- Copy and paste as new layer Tortured Dreams_Word Art. resize to 50%.
12.- Copy and paste as new layer Tortured Dreams_Double Bow 1. Resize to 15%. Add drop shadow as before.
13.- Copy and paste as new layer Tortured Dreams_Goth doll 1. Resize to 20%. Rotate 20 degrees to the right. Add drop shadow as before.
14.- Copy and paste as new layer Tortured Dreams_Marker 2. Resize to 25%. Rotate 20 degrees to the right. Add drop shadow of choice.
15.- Copy and paste as new layer Tortured Dreams_Feather 1. Resize to 25%. Put this layer below the other elements, as you can see in my image. Duplicate this layer and reflet.
16.- Copy and paste Tortured Dreams_Tag 3. Resize to 30%, with your eraser tool, delete a bit in the lace. Add drop shadow.
17.- Copy and paste as new layer Skull & Crossbone Sticker 1. resize to 25%.
18.- Copy and paste as new layer Tortured Dreams_Pentagram 1. Resize to 40%. Effects/special effects/Eye Candy 4000/Corona as you did in step # 6.
19.- Write you licence number, and merge all visible layers.
20.- Write your name, I used font: Broken 74, sizw: 36. Colour: Outside: none, Inside: black. Effects/Special Effects/Eye Candy 4000/ Gradient Glow. Colour: white. Add drop shadow as before.
21.- Save as png.
It's done.
I hope you like it. I love to see all you result, if you want you can send me your tags with the results of my tuts to: newartisticdreams@gmail.com
Thank you for try this and the others tuts.
This tutorial was writting by me, Mariel - Artistic Dreams© on 20th of march of 2009, any resemblance to any other tutorial is completely coincidental.
Mariel - ©Artistic Dreams


No hay comentarios:
Publicar un comentario