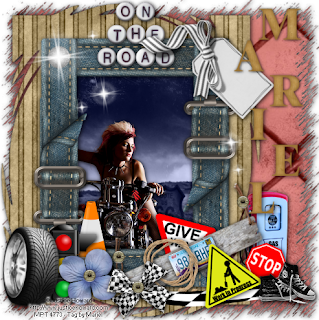
Well my second tut today, is with this wonderful scrap kit from Scrappingmar called "Route 66", I hope you like it.
For this tut you will need the following things:
This beautiful scrap kit from Scrappingmar called "Route 66", is a PTU so you can purchase HERE.
The tube is a girl from ©Justice Howard, you can purchase this tube and others in MPT, HERE.
I used Filter Unlimited 2.0 you can Download this filter HERE.
Let's begin:
1.- Open a new raster layer of 500 x 500 pixels, transparent.
2.- Copy and paste as new layer Scrappingmar_paper 19, resize to 75%. Apply especial effects/filter Unlimited 2.0/edges, square/square edges o2. Add drop shadow of choice.
3.- Copy and paste Scrappingmar_Paper 18. Apply special effects/filter Unlimited 2.0/Edges, square/square edge 14. Then with your deform tool change this layer, as you can see in my image. Add drop shadow.
4.- Copy and paste Scrappingmar_66, resize to 50% and then to 80%. With your magic wand select into the frame, go to select/modify/expand 5.
5.- Copy and paste as new layer Scrappingmar_paper 2, resize to 50% and then again to 75%. Go to select/invert select and then Edit/cut. Put this layer below the frame.
6.- Copy nd paste as new layer the tube, resize to convenience, I reflet the tube image, too; and then apply drop shadow of choice to the frame layer.
7.- Now you have to add all the elements you can see in my tag, see my image for help in case to put all of them in their positions, just resize as I do and paste as new layer all of them. Begin:
- Scrappingmar_97, resize to 20%, and add drop shadow.
- Scrappingmar_ 27, resize to 50%.
- Scrappingmar_100, resize to 20%
- Scrappingmar_8, resize to 20% and then again to 50%. Rotate 50 degrees to the right. Add drop shadow.
- Scrappingmar_1, resize to 15%. Rotate 25 degrees to the right. Add drop shadow.
- Scrappingmar 74, resize to 5%, duplicate a few times, put in the center of the flower one of them. To put the others look my image for help.
- Scrappingmar_6, resize to 20%, add drop shadow.
- Scrappingmar_101_sparkles, resize to convenience, I used 50%, with your lace tool, select both last stars, go to edit/cut and paste as new layer and put as you can see in my image.
- Scrappingmar_65, resize to 20%.
- Scrappingmar_48, resize to 20% and add drop shadow.
- Scrappingmar_5, resize to 20% and then again to 80%. Rotate 25 degrees to the left.
- Scrappingmar_7, resize to 20% and again to 80%. Rotate 25 degrees to the right.
- Scrappingmar_25, resize to 15%, add drop shadow.
- Scrappingmar_44, resize to 15%. Rotate 25 degrees to the left and add drop shadow.
- Scrappingmar_31, resize to 20% and add drop shadow.
- Scrappingmar_10, resize to 20% and add drop shadow.
8.- Now write your licence number and merge all visible layers.
9.- Write your name with the alpha provided with the kit, resize one by one the letters to convenience, and add drop shadow of choice.
10.- Save as png.
It's done.
I hope you like it. I love to see all you result, if you want you can send me your tags with the results of my tuts to: newartisticdreams@gmail.com
Thank you for try this and the others tuts.
This tutorial was writting by me, Mariel - Artistic Dreams© on 26th of march of 2009, any resemblance to any other tutorial is completely coincidental.
Mariel - ©Artistic Dreams


No hay comentarios:
Publicar un comentario