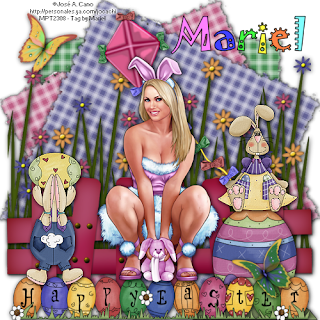
Hi I make this new tut, and want to tell to you that I'm sooooooo Happy!!! because Missy of Scraps with Attitude, accept me to design tuts for her Creative Team. Thank you darling, I love your work. Please visit her blog, and see all her beautiful scraps kits HERE.
For this tut you will need the beautiful scarp kit PTU from Missy, called "Easter Bunny Hunt", you can purchase her kit HERE.
The tube is a beautiful girl of ©Jose A. Cano, and you can buy his tubes and a licence number at MPT, just go HERE.
Let´s begin:
1.- Open a new raster layer of 500 x 500 pixels. Transparent.
2.- Copy and paste "Easter Egg Hunt_ paper 2", paste as new layer, resize to 60%. Go to effects/filters/ Unlimited 2.0./Edges squares/ Squares Edges 04. Then add some drop shadow of choice.
3.- Do the same as before with "Easter Egg Hunt_Paper 3", and at the end rotate 25 degrees to the left.
4.- Again step 2 but now with "Easter Egg Hunt_Paper 1", and at the end rotate 25 degrees to the right this layer.
5.- Copy "Easter bunny hunt_grassy flower patch" and paste as new layer, resize this layer to 60%. Add the same drop shadow as before.
6.- Copy and paste as new layer, "Easter bunny hunt_fence 3", resize to 60%. Add drop shadow.
7.- Now copy and paste as new layer the word art " Easter Bunny Hunt_Happy Easter", resize to 60%. put as you can see in my image this layer, below.
8.- Copy "Easter Bunny Hunt_ Egg", paste as new layer, below the word art layer, and resize to 25%. Add drop shadow.
9.- Copy "Easter Bunny Hunt_GirlBunny" and paste as new layer, forward the egg tube, use my image for help. Resize to 25%.
10. Copy and paste "Easter Bunny Hunt_HungingBunny" as new layer, resize to 30%. Add drop shadow.
11.- Copy and paste as new layer "Easter Bunny Hunt_Kite", resize to 40%, and put this tube in Bunny's girl hand.
12.- Now copy and paste two of the "Easter bunny hunt_butterflies", as new layer, resize to 15%. An add drop shadow.
13.- Copy the ©Jose A. Cano tube, and paste as new layer, resize to 75%. Add drop shadow of choice.
14.- Add your licence number and merge all visible layers.
15.- Write your name, I used font: Jokerman, size: 48, colours: outside: black, inside: different bright colour of choice. You have to write one by one the letters be carefull and go right with this text.
It's done, hope you like it. I love to see all you result, if you want you can send me your tags with the results of my tuts to: newartisticdreams@gmail.com
Thank you for try this and the others tuts.
This tutorial was writting by me, Mariel - Artistic Dreams© on 14th of march of 2009, any resemblance to any other tutorial is completely coincidental.
Mariel - ©Artistic Dreams


No hay comentarios:
Publicar un comentario