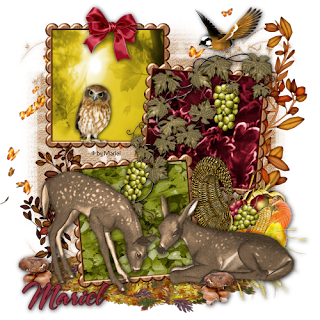
For this tutorial you will need the following things:
Just the wonderful kit from "Karla Scrapz" called "Precious Autumn", is a PTU and you can purchase the kit HERE.
A mask of your choice for use as background.
Let's begin:
1.- Open a new raster layer of 500 x 500 pixels.
2.- Copy and paste as new layer Paper 11, open your mask in your PSP, go to masks/new mask/from an image, and apply the mask to the paper layer. Then go to masks/delete mask, and let this layer as background of your tag.
3.- Copy and paste as new layer frame 2, resize to 50%, then with your magic wand select into the three squares, and fill into them with three different papers from your Karla's kit. I used Papers 1, 6 and 8.
4.- Copy and paste as new layers Elements 5 and 6, resize to 40%, put them below the frame backgrounds, and apply some drop shadow.
5.- Copy and paste as new layer element 3, again resize to 40% or less, move this layer below as background, forward the mask layer.
6.- Copy and paste as new layer the red ribbon, and the owl, resize to convenience, and apply drop shadow as before.
7.- Copy and paste as new layer element 41, resize to 30%, and put thislayer in the middle of your frame. See my image for help.
8.- Copy and paste as new layer elements 2 and 4, reflet elelment one and resize both layers to 40%. Then apply drop shadow as before.
9.- Copy and paste as new layer element 54, resize to convenience and move the layer below the frame background. See my image for help.
10.- Copy and paste element 26 resize to 25%, and duplicate once, then reflet one of them, and apply drop shadow of choice to all this elements.
11.- Copy and paste as new layer element 61, move this layer farward the frame layer and apply drop shadow as before.
12.- Copy and paste a bird or a butterfly and put this layer as you can see in my tag. Resize if you need.
13.- Merge all visible layer, add your copyright, and your name with a font of your choice, or use the beautiful alpha includes in the kit.
14.- Save as png.
It's done.
I hope you like this tut.
I love to see all your results, if you want you can send me your tags with the results of my tuts to: newartisticdreams@gmail.com
Thank you for try this and the others tuts.
This tutorial was writting by me, Mariel - ©Artistic Dreams on 21st of september of 2009 any resemblance to any other tutorial is completely coincidental.
Mariel - ©Artistic Dreams


No hay comentarios:
Publicar un comentario