For this tut you will need the following things:
First of all the beautiful scrap kit from CM Designz called "Doux Reves", you can buy this scrap kit HERE.
The tube is a beautiful girl from Suzanne Woolcott last pack, and you can buy her tubes HERE.
The template #34 and the wordart are from Babe's Designz and you can download them HERE.
Let's begin:
1. Open your template in your PSP, duplicate the image and close the original.
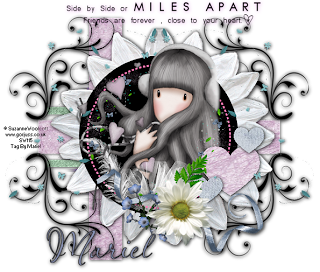
2.- Copy and paste the papers of your choice from the scrap kit to cover all the template's elements. Let the middle circle in black colour, and the doodles too, as you can see in my tag.
3.- Put the three hearts layers as you can see in my tag and add a black drop shadow of choice.
4.- Copy and as new layer the frame flower, resize to 75%, and move the layer below the black middle circle in the template. See my image for help. Then add drop shadow as you used before.
5.- Duplicate the doodle element from the template and then reflet, put them as you can see in my tag. Add drop shadow as you used before.
6.- Copy and paste as new layer Deco, resize to 50%, go to layers and duplicate once and reflet, put both layers as you can see in my tag.
7.- Copy and paste as new layer Swirlpapillon2, resize to convenience, and put this layer into the black middle circle, then duplicate once, turn down and reflet. Now you have both layers into the middle black circle of your template.
8.- Now copy and paste as new layer the ©Gorjuss tube, and resize to convenience.
9.- Copy and paste as new layers all the other elelments of your choice, I used voilage, plume, ruban 2, feuille, branchefleurie 2, and fleurnat. Resize all the elements to convenience, I used 25% for some elements, or a little more biggest if you like. Then add drop shadow if you want.
10.- Choice one of the wordarts, copy and paste as new layer and add drop shadow with a colour who match with your tag.
11.- Merge all the visible layers, add your licence number and write your name, I used font: Aquarelle, size: 48, colour outside: black, colour inside: #8891B3. And the same drop shadow as before.
12.- Save as png.
It's done.
I hope you like this tut.
I love to see all your results, if you want you can send me your tags with the results of my tuts to: newartisticdreams@gmail.com
Thank you for try this and the others tuts.
This tutorial was writting by me, Mariel - ©Artistic Dreams on 4th of august of 2009, any resemblance to any other tutorial is completely coincidental.
Mariel - ©Artistic Dreams


No hay comentarios:
Publicar un comentario