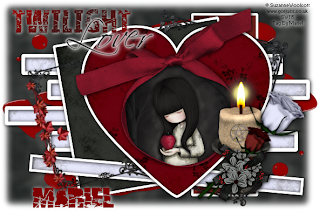
For this tut you will need the following things:
First of all the beautiful scrap kit from Touch Me, called "Gothic Night", is a PTU and you can purchase this scrap kit HERE.
The tube is a ©Suzanne Woolcott Twilight girl, you can purchase her tubes and your licence number HERE.
The template # 23 is from Scrapity Scraps and More, you can download HERE.
Let´s begin:
1.- Open your template in your PSP. Copy and paste as new image, and close the original.
2.- Now with your magic wand select into the heart, then copy and paste as new layer Paper 4, then go to selection/invert and then Edit / Cut.
3.- Again with your magic wand select into the large rectangle, copy and paste as new layer Paper 11, and then selection/invert and again Edit/cut.
4.- With your magic wand select into the little rectangles, and paste as new layer Paper 5 and do the same as before, go to selection/invert, and then Edit/ cut.
5.- Copy and paste as new layer ribbon circ 1, resize to 50% and then with your magic wand select into the frame.
6.- Copy and paste as new layer the ©Gorjuss image. Resize to convenience, then go to selection/invert and then Edit/Cut. Move this layer below the frame layer. Apply drop shadow to the frame layer with the followings settings: 1 - 1 - 90 - 9,9 black colour.
7.- Copy and paste as new layer Framer 1, resize to 35%, rotate free 25 degrees to the right, then duplicate this layer and reflet, and move both layers below the frame background red layer.
8.- Copy and paste as new layer Swirly 5, resize to 20%, and rotate free 25 degrees to the right. Put this layer as you can see in my tag.
9.- Copy and paste as new layer candle min, resize to 40%, and put this layer as you can see in my tag.
10.- Copy and paste as new layer Both roses, resize one to 50% twice, and the other to 40% twice, rotate the first one 45 degrees to the left, and the other 40 degrees to the right too, apply drop shadow as before, and put them as you can see in my image.
11.- Copy and paste as new layer Bow&flower 1, resize to 25% and put this layer as you can see in my image.
12.- Merge all visible layers, then copy and paste Gothic 3, resize to 40%, put this layer below the layered image, and then duplicate layer, and turn down and reflet one of them, see my image for help.
13.- Copy and paste as new layer Paper 6, with your rectangle select, select a rectangle as you can see in my image, and then go to selection/invert, and edit/cut. Apply gaussian effect with 5.
14.- Merge all visible layers, add your licence number.
15.- Now work in the word art, or choose a Twilight button or other charm to put in your tag, write your name, I used: Broken 74 size: 36 colour: outside: none, inside: #800000. Then apply drop shadow with white colour and the same settings as you used before.
16.- Save as png.
It's done.
I hope you like it.
I love to see all your results, if you want you can send me your tags with the results of my tuts to: newartisticdreams@gmail.com
Thank you for try this and the others tuts.
This tutorial was writting by me, Mariel - ©Artistic Dreams on 2nd of june of 2009, any resemblance to any other tutorial is completely coincidental.
Mariel - ©Artistic Dreams


No hay comentarios:
Publicar un comentario