For this tut you will need the following things:
The beautiful scrap kit from PimpD, called "Bad Vamps", is a PTU and you can purchase this kit HERE.
Images from The Twilight Guide web page, of your choice.
Template called "memories of a legend" from Butterflyflutterbycreations.
Buttons from TK Twilight Buttons, freebies from HERE.
Let's begin:
1.- Open your template in your PSP, duplicate this image and close the original.
2.- Delete the layers you don't need, bacground, wordart and credits layers.
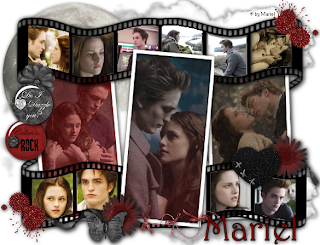
3.- Now with your magic wand select into the first big rectangle in the center of the template. Go to selections/modify/expand/ 2. Now copy and paste as new layer PP01, from the scrap kit, then go to selection/invert selection and then Edit/cut.
4.- Do the same with the other rectangle, but now copy and paste as new layer PP10.
5.- Again the same in the third rectangle but now copy and paste as new layer PP06.
6.- Now with your magic wand select again into the white frame of the first rectangle, and then copy and paste an image of your choice of Twilight film. Then go to selection/invert selection and then edit7cut. Go to layers palette, and download opacity of this layer to 52%.
7.- Do the same as step # 6 but with others images of your choice, in the others rectangles frames.
8.- Now with your magic wand select into the film frames, one by one the squares, and copy and paste into them different images from Twilight film of your choice, resize this images to convenience. See my image for help.
9.- Then copy and paste as new layer "moon", resize to 40% and put this layer below all the other layers, move this layer as you can see in my image. Then copy and paste as new layer "Cloud", go to layers/duplicate twice, and move one to the top, other to the center and the last one move down the tag. See my image for help.
10.- Copy and paste as new layer some flowers from your scrap kit, resize to convenience, and duplicate Flower 03, once, put as you can see in my tag.
11.- Copy and paste as new layer "Splat 03", resize to 20%. Then go to layers/dulicate and then reflet and turn up the layer. See my image for help.
12.- Copy and paste as new layer "Dark Fly", resize to 20%, and put as you can see in my tag.
13.- Copy and paste "black heart", resize to convenience, and put as you can see in my tag. Now copy and paste as new layers some ribbons, resize this layers as you need, and duplicate some of them, and relfet. I do this with the black ribbon.
14.- Now copy and paste as new layers some buttons of your choice, and resize to convenience. Apply drop shadow and put them as you can see in my tag.
15.- Merge all visible layers, add your copyright information, and apply drop shadow as you used before.
16.- Write your name with a font of choice, and apply the same drop shadow as you used before.
17.- Save as png.
It's done.
I hope you like it.
I love to see all your results, if you want you can send me your tags with the results of my tuts to: newartisticdreams@gmail.com
Thank you for try this and the others tuts.
This tutorial was writting by me, Mariel - ©Artistic Dreams on 8th of june of 2009 any resemblance to any other tutorial is completely coincidental.
Mariel - ©Artistic Dreams


No hay comentarios:
Publicar un comentario