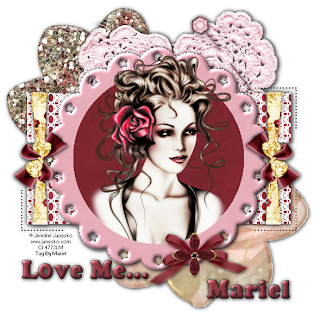
For this tut you will need the following things:
First of all the beautiful scrap kit from Dees Deelights, called "Vintage Rose", is a PTU and you can purchase the kit HERE and HERE.
The tube is a ©Jennifer Janesko from CILM; you need a licence number and can purchase her tubes HERE.
The template I used is from Scraps by Li Almeida, and you can download the template HERE.
Let's begin:
1.- Open the template in your PSP, duplicate the image and close the original.
2.- Select the backgorund layer and the credits layer ans delete both.
3.- With your magic wand select into the large rectangles below the black frame, and copy and paste VrPaper 12, resize to 15%, then go to selection/invert and then edit /Cut. Apply drop shadow of choice to this layers.
4.- Do the same with the Black frame, now fill this frame with VrPaper 05. Resize this layer to 25%. Then go to selection invert and then edit/Cut. Now apply a bit inner bevel of choice and the same drop shadow as before.
5.- Select now the circle of the center, fill this layer with VrPaper 06, resize to 25%. And then go to selection/invert and then Edit/Cut.
6.- Now copy and paste the ©Janesko tube, resize if it's necessary, now select outside the circle layer and change the selection to the layer of the tube. With your eraser tool, delete all what exceed the circle.
7.- Copy and paste as new layer Vintage Flower brad 04, and VrFlower 01, resize to 50%, and move both layers as background, see my image for help.
8.- Copy and paste as new layer Ribbon 01, resize to 7%, rotate free 90 degrees to the right, then go to layers and duplicate once, now reflet one of this layers, and put both layers as you can see in my tag.
9.- Copy and paste as new layer Heartdoily02, resize to 15%, move below the pink frame layer and apply drop shadow.
10.- Copy and paste as new layer Pin 01, resize to 10%, reflet the layer and with your eraser tool delete part of the pin, as you can see in my image. Apply drop shadow.
11.- Copy and paste as new layer Bow 05, resize to 10%, then apply drop shadow, now copy and paste as new layer Bradgold 5, resize to 15%, and then put this layer in the middle of the bow.
12.- Merge all visible layers, and add your licence number.
13.- Write your name, with a font of your choice, I used: Cooper Black, size: 36, colour outside: Black, colour inside: #812832. Apply a soft inner bevel and drop shadow as before.
14.- Save as png.
It's done.
I hope you like it.
I love to see all your results, if you want you can send me your tags with the results of my tuts to: newartisticdreams@gmail.com
Thank you for try this and the others tuts.
This tutorial was writting by me, Mariel - ©Artistic Dreams on 16th of june of 2009, any resemblance to any other tutorial is completely coincidental.
Mariel - ©Artistic Dreams


No hay comentarios:
Publicar un comentario