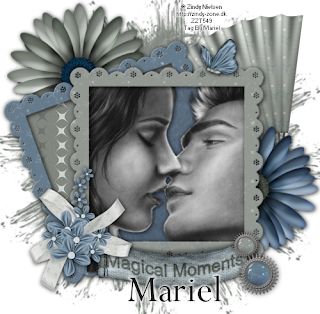
For the following tut you will need:
The beautiful scrap kit by Tina's Magical Scrap World, called "Magical Moments", is a PTU and you can purchase her kit HERE.
The tube is a one of the wonderful collection from ©Zindy Nielssen, you need a licence number fo use and purchase her tubes HERE.
The mask # 178 is from Westcottlass Creations, and you can download HERE.
Let's begin:
1.- Open a new raster layer of 500 x 500 pixels.
2.- Copy and paste as new layers magidaisy 2 and 3, resize both layers to 55%. Put them as you can see in my tag, one below the other.
3.- Copy and paste as new layer fan 2, resize to 80%, and move this layer below the flowers layers.
4.- Copy and paste as new layer frame 1, resize to 80% three times and rotate free 20 degrees to the left. With your magic wand select into the frame, go to selection/modify/expand 5. Then copy and paste as new layer paper 10. Go to selection/invert and then edit/cut. Move this layer below the frame layer. Add drop shadow of choice to the frame.
5.- Do the same as step 5 but now with frame 2, and do not rotate free this layer. See my image for help.
6.- Copy and paste as new layer ©Zindy Nielssen tube, resize to convenience. And add drop shadow of choice.
7.- Copy and paste as new layer tag1, resize to 50%, and add drop shadow of choice.
8.- Copy and paste as new layer beautyflowerbow1, resize to 40% and add drop shadow as before. Put as you can see in my image.
9.- Copy and paste as new layer Butterfly 1, resize to 25%, add drop shadow as before.
10.- Copy and paste as new layers starbrad1 and 2, resize one to 25% and the other a little more. And put them as you can see in my image. Add drop shadow of choice.
11.- Merge all visible layers. Now copy and paste as new layer paper 17. Open your masks in your PSP, and apply the masks to the paper layer doing masks/new mask/from an image, then again masks/invert and then masks/delete mask, and resize the mask layer to 120%. Move the mask layer below all the other elements, and put as you can see in my image.
12.- Add your licence number and write your name, I used font: Perpetua. Size: 48. Colour: outside: none, inside: black. Add some especial effect, I used Eye Candy 4000/Corona, white colour and default settings.
13.- Save as png.
It's done.
I hope you like it.
I love to see all you result, if you want you can send me your tags with the results of my tuts to: newartisticdreams@gmail.com
Thank you for try this and the others tuts.
This tutorial was writting by me, Mariel - Artistic Dreams© on 8th of may of 2009, any resemblance to any other tutorial is completely coincidental.
Mariel - ©Artistic Dreams


No hay comentarios:
Publicar un comentario