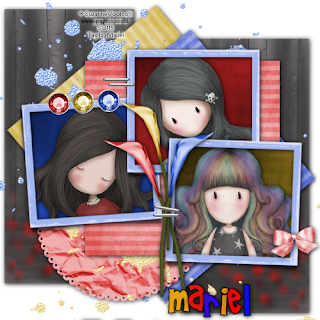
I made this tag using the new FTU from me called "Primary Colours", you can download this kit HERE.
The tubes are from ©Suzanne Woolcott, and you can purchase her tubes HERE.
Lets begin:
1.- Open a new raster layer of 500 x 500 pixels.
2.- Open the ©gorjuss image called "Poppy Wood" with your rectangle select tool, select a rectangle from the background, go to copy this selection and paste as new layer in your tag. Duplicate this layer, and move the second one a little below the first as you can see in my image.
3.- Copy and paste as new layers the papers 12, 13 and 14, resize the three layers to 75% twice. Rotate free the yellow layer 50 degrees to the right and the blue paper layer 45 degrees to the right. Add drop shadow of choice to the three layers.
4.- Copy and paste as new layers elements 18 and 19, resize to 35%, and put them as you can see in my tag.
5.- Copy and paste as new layer element 37, resize to 25%, move this layer below the red paper layer and the yellow splatter layer, add drop shadow of choice.
6.- Copy and paste as new layer frame 26, resize to 75%, with your magic wand select into the frames one by one, then copy and paste as new layers the three different colours papers of choice. I used papers 7, 9 and 19, go to select/invert select and then edit/cut.
7.- Copy and paste the ©Gorjuss tubes, resize to convenience and delete all what exceed the frames. Add drop shadow as before.
8.- Copy and paste as new layers the three flowers, reflet one of them, and resize someone to 80%, put them as you can see in my image.
9.- Copy and paste as new layer element 43, resize to 50%, duplicate the layer three times. Put the four layers as you can see in my image.
10.- Copy and paste as new layers the other elements, the glass charms, and the bow, resize to convenience, and add drop shadow of choice.
11.- Merge all the visible layers and add our licence number.
12.- Write your name with a font of choice, I used: Pornhut, size: 48, and write letter by letter, and change the colour inside to yellow, red and blue, as you can see.
13.- Save as png.
It's done.
I hope you like it.
I love to see all you result, if you want you can send me your tags with the results of my tuts to: newartisticdreams@gmail.com
Thank you for try this and the others tuts.
This tutorial was writting by me, Mariel - Artistic Dreams© on 6th of may of 2009, any resemblance to any other tutorial is completely coincidental.
Mariel - ©Artistic Dreams


No hay comentarios:
Publicar un comentario