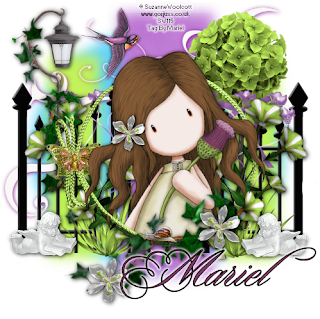
Hi all, another tut today this time with a new scrap kit from Karlascrapz, hope you like it.
For this tut you will need the following things:
The beautiful scrap kit from KarlaScrapz called "My garden in Spring", is a PTU and you can purchase this kit HERE.
The tube is one of the biggest collection from ©Suzanne Woolcott, you can purchase her pack of tubes in her shop HERE.
Template # 95 from Designs by Ali, you can download HERE.
Let's begin:
1.- Open a new raster layer of 500 x 500 pixels, transparent.
2.- Open in your psp the Template # 95 from designs by Ali, duplicate and close the original.
3.- Select all the black rectangles from your template and paste one by one in your tag, resize to 80%. and do the same with the last circle layer.
4.- Select into the circle layer with your magic wand, copy and paste as new layer K-S-Paper 3, go to selection/ invert select, and then edit/cut. Do the same with papers 1 and 2 in the rectangle layers.
5.- Select the circle layer and go to effects/blur/gaussian blur to 10. Select one by one the rectangles, and do the same, apply the same gaussian blur.
6.- Copy and paste as new layer the shape 4 layer from your template, resize if you need and apply drop shadow with a purple colour.
7.- Copy and paste as new layer k-s flower 1, resize to 30%, go to layers/duplicate and reflet this layer.
8.- Copy and paste as new layer k-s tree 2, resize to 40%, and put this layer as you can see in my image.
9.- In your k-s billboards, select one of them with your lace tool, and then copy and pasta as new layer. Resize to 70%, and with your eraser tool delete the arrow at the ende of the fence.
10.- Copy and paste as new layer k-s petunia, resize to 25%, go to layers/duplicate layer and then reflet. Add drop shadow of choice.
10.- Copy and paste as new layer k-s petunia, resize to 25%, go to layers/duplicate layer and then reflet. Add drop shadow of choice.
11.- Copy and paste as new layer k-s lampost. Reflet and resize to 80%, with your eraser tool delete the foot at the lampost, as you can see in my image. Add drop shadow of choice.
12.- Copy and paste k-s angel, resize to 25%, go to Layers/ duplicate layer, and then reflet, on of them. Add drop shadow of choice.
13.- Copy and paste as new layer k-s string green, resize to 50%, select into the frame with your magic wand, copy and paste as new layer the ©gorjuss tube, and resize if you need, then go to selection/invert selection, and with your eraser tool, delect all what you need from your tube, see my image for help.
14.- Copy and paste as new layer k-s creeper, resize to 30% and then go to image/rotate free 12 degrees to the right. Add drop shadow as before.
15.- Copy and paste as new layer k-s snail, resize to 20%, and put this layer as you can see in my image.
16.- Copy and paste as new layer k-s bird 2, resize to 20%, image/reflet, and then add drop shadow of choice.
17.- Copy and paste as new layer k-s african iris 2, resize to 8%, duplicate twice, and put one of this layers in the hair of the ©Gorjuss doll. And the others layers as you can see in my image.
18.- Merge all visible layers, and add your licence number.
19.- Wtite your name, with a font of choice, and apply some effect, I used Eye candy 4000/Corona/ white colour, with default settings.
20.- Save as png.
It's done.
I hope you like it. I love to see all you result, if you want you can send me your tags with the results of my tuts to: newartisticdreams@gmail.com
Thank you for try this and the others tuts.This tutorial was writting by me, Mariel - Artistic Dreams© on 4 th of april of 2009, any resemblance to any other tutorial is completely coincidental.
Mariel - ©Artistic Dreams


No hay comentarios:
Publicar un comentario