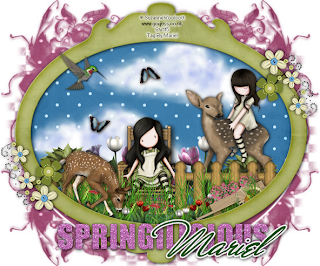
For this tut I used Mar's scrap kit PTU called "Springilicious", you can purchase her kit HERE.
You will need some supplies you can download HERE (Mask and cloud)
An the beautiful art of ©Suzanne Woolcott, you can purchase her tubes and licence number HERE.
Let's begin:
1.- Open a new raster layer of 600 x 500 pixels. Transparent.
2.- Copy and paste as new layer, paper #13 from Mar's scrap kit. Resize to 80%.
3.- Open the mask provided, in your psp, go to masks/new mask/ form an image. Select the mask #5 and then go to Masks/delete mask. Resize to 105%.
4.- Copy and paste the frame #50 as new layer. Resize to 60%.
5.- Select into the frame with your magic wand, expand to 3.
6.- Copy and paste as new layer paper #10. Resize to 65%. Then go to select/invert select and Edit/cut. Put this layer below the fram layer. Copy and paste the cloud tube supplied, duplicate and put as you can see in my image.
7.- Copy and paste element # 27 as new layer, resize to 25%, duplicate for 10 times. Put this layers, as you can see in my image.
8.- Copy and paste element #81 as new layer, resize to 25%. duplicate and relfet one of this layers.
9.- Copy and paste element #82 as new layer, resize to 25%, put this layer below the fence, duplicate and reflet.
10.- Copy and paste element #83 as new layer, resize to 25%, put this layer below the fence too, duplicate and relfet.
11.- Select the fence layer in your tag, the copy and paste as new layer, the chair tube, element #23 from Mar's kit. Paste as new layer, resize to 23%. Choice Suzanne's tube, resize too, and put the girl sitting in the chair. As you can see in my image.
12.- Copy and paste the other tube by @Suzanne Woolcott, resize, and put this tube below the fence tube.
13.- Now copy and paste as new layers, some of the flowers from the scrap kit, you can use others than I used. I used elements # 30, # 28, and # 29. Resize to 10%, duplicate someones, and put as you can see in my image.
14.- Copy and paste as new layer element #20, resize to 20%, reflet, and rotate 15 degrees to the left.
15.- Copy and paste as new layer element #80, resize to 25%. Put as you can see in my image.
16.- Do the same with bird and butterflies.
17.- Copy an paste as new layer element #37, resize to 15%, duplicate, reflet and flip.
18.- Copy and paste the wordart #44 as new layer, resize to 50%. Add drop shadow of choice.
19.- Write you licence number, and merge all visible layers.
20.- Write your name, I used font: Mr. Canfields, size: 60. Colour outside and inside: #005000. Add Effects/Filter Eye Candy 4000/ Gradient glow. White, with this settings: Glow width: 3.00, soft corners: 7 and Overall opacity: 100%. Select Drow only outside selection.
21.- Add drop shadow of choice, I used: black drop shadow with this settings: 1 - 1 - 88 - 8,6.
22.- Save as png.
I love to read your comments on my cbox about this or other tuts, thank you!!
This tutorial was writting by me, Mariel - Artistic Dreams© on 2nd, march of 2009, any resemblance to any other tutorial is completely coincidental.
Mariel - ©Artistic Dreams


No hay comentarios:
Publicar un comentario