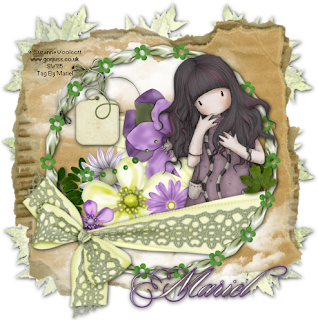
Hi all!!! Today my new tut is with a wonderful FTU kit from Bel Vidotti Scraps, called "Violet Hills". I love this scrap Bel, thank you for shared. You can download this scrap kit in Bel's blog HERE.
I used the beautiful art from ©Suzanne Woolcott, you can purchase her art HERE.
Let's begin:
1.- Open a new raster layer of 500 x 500, transparent.
2.- Open paper # 19 from the scrap kit Violet Hills, and paste as new layer, resize to 80%, twice. Open your mask in psp. Go to masks/new mask/ from and image. And then again Masks/ delete. Apply drop shadow of choice. I used 1 - 1 - 88 - 8,6. Black colour.
3.- Open the cardboard, copy and paste as new layer, and resize to 90%.
4.- Open cloud 01 and cloud 02, copy and paste as new layer, one up, and one down the cardboard. Use my image for help. Not need resize.
5.- Select frame 05, copy and paste as new layer, resize to 70%.
6.- Copy and paste tag 03 as new layer, resize to 20%, delete a bit at the top of the wire, and then add the same drop shadow as before.
7.- Open the flowers you like and some leaves, resize and paste as I show in my tag, you can use differents. Use your imagination and play with them. Use my image for help.
8.- Select wrapbow 02, copy and paste as new layer, resize to 50%, delete all you need to see the frame and put this layer below the frame.
9.- Open scatteredflowers 02, select a little flower green, copy and paste as new layer. and dulicate one by one your layers, and put the flowers as you can see in my image all around the frame.
10.- Copy and paste the tube of ©Suzanne Woolcott, resize to 80%, delete all what exceed the wrapbow. And then put this layer below the wrapbow.
11.- Put your licence number and merge all visible layers.
12.- Write your name. I used Font: Portfolio, size: 48, Colour outside: #664572, colour outside: #ededa6. Add drop shadow as before.
13.- Save as png.
It's done, hope you like this tut.
I love to read your comments on my cbox about this or other tuts, thank you!!
This tutorial was writting by me, Mariel - Artistic Dreams© on 27th february of 2009, any resemblance to any other tutorial is completely coincidental.
This tutorial was writting by me, Mariel - Artistic Dreams© on 27th february of 2009, any resemblance to any other tutorial is completely coincidental.
Mariel - ©Artistic Dreams


No hay comentarios:
Publicar un comentario