
Hi today my tut is a tag made with a beautiful scrap freebie that I saw in Seachell's blog, I hope you like this new tut from me.
You will download the FTU scrap kit in Seachell's blog, called "Magical Day".
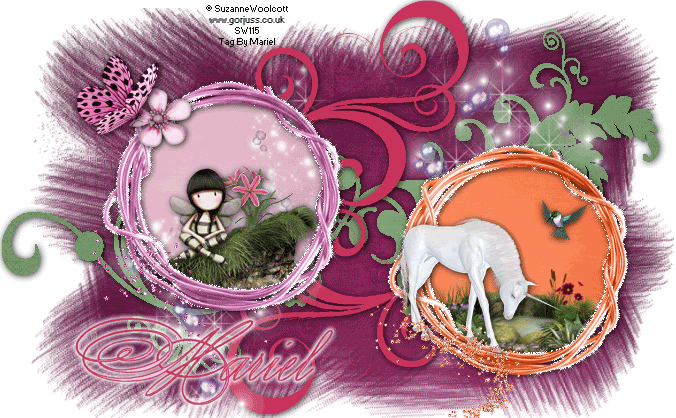
I used for this tag, the beautiful art of ©Suzanne Woolcott, you can purchase her art and a licence number HERE.
The awesome template # 131 is from Dezigns by Ali. And you can find it HERE.
The mask #116 is from Weescotlass Creations.
The filter you'll need is Alien Skin Xenofex 2/ Constellation.
Let's begin:
1.- Open a new raster layer of 700 x 500, transparent.
2.- Fill the layer with colour white.
3.- Open paper # 6 and open the mask # 116 in your psp.
4.- Copy and paste the paper as new layer, the go to masks/new mask/from an image and select the mask # 116. Go to masks/delete mask.
5.- Open the template # 131 from Ali's Dezigns, Select doodle pink, copy and paste as new layer in your tag.
6.- Select black doodle, copy and paste as new layer, then open paper # 10 in your psp and copy this paper.
7.- Go to doodle black layer, select all/invert. And then paste the paper as new layer. And again Selection/invert. And Edit/cut.
8.- Copy and paste both circles. Select one of them, and fill with paper #7. Select the other circle, and fill with paper # 8.
9.- Copy frame #17, and paste as new layer. Resize to 35%. Do the same with frame #16.
10.- Select into the pink frame, the copy from your scrap kit the element # 8, paste as new layer and resize to 35%. put this layer below the frame, go to Select/invert, and then edit/cut.
11.- Copy and paste as new layer element # 2, resize to 15%. Look at my image as guide.
12.- Copy image #9. Select into the orange frame with your magic wand, the paste as new layer. Resize image to 35%. And put this one below the frame. Go to select invert, and the Edit/Cut.
13.- Copy element #4, paste as new layer, resize to 10%. And do the same with the red flower. Use my image as guide.
14.- Copy and paste the unicorn as new layer, reflet, and resize to 30%.
15.- Copy and paste the pink flower at a side of pink frame, as new layer, resize to 20%. Do the same with the pink butterfly.
16.- Select the tube of a fairy, from ©Suzanne Woolcott, copy and paste as new layer, resize to 25%. Put the tube as you can see in my image.
17.- Then copy and paste as new layers, all the stars tubes, resize to 50%. Ad put both below frames as you can see in my image.
18.- Do the same with the glitter stars, pink and orange. Resize to 40%. For help go to my image too.
19.- Duplicate twice your tag, in one of the images, select the pink frame layer, go to Effects/ Alien Skin Xenofex 2/ Constellation, with this settings:
Stars size: 2.00
Size variation: 31
Edge star density: 24
Overall star density: 0
Overdrive: 100
Twinkle amount: 48
Twinkle rotation: 45 degrees
Keep original image.
Then go to orange frame layer, and do the same with the effect.
20.- Do the same in the other two images with both frames, but now change the Random Seed.
21.- Merge all visible layers, in the three images.
22.- Copy one of them, open your Animation, paste as new animation.
23.- Go to psp, again, copy one of the others image, go to Animation, paste after actual frame. And do the same with the last image you have in psp.
24.- In Animation, you will have three frames in the same animation, put all of them in frame properties/ 10.
23.- Add your licence number, and your name, optimize and save as gif.
It's done.
Thank you for trying my tutorial.This tutorial was writting by me, Mariel - Artistic Dreams© on 22nd february of 2009, any resemblance to any other tutorial is completely coincidental.
Mariel - ©Artistic Dreams


No hay comentarios:
Publicar un comentario